Are you willing to start blogging, but without money on web hosting and domain name?
After creating the blog, you need to edit some settings in BlogSpot. I will tell you each of them, one by one. You need to edit these settings only once after creating the blog. So let me tell you about the settings in BlogSpot according to the categories.
Now I have told you about all the Basic Settings in BlogSpot. Its the time that I tell you about posts, comments and sharing settings.
Next are the email settings. Let me tell you about them in brief.
Email
Now let's move on to other settings.
There is nothing to change in Language and Formatting. Leave these settings as they are by default.
Now there is Search Preferences. These are very important as the blog's ranking on Google is affected by these settings. So read them carefully.
Now we have Other Settings. Let's see them.
These were the other settings in BlogSpot. Now, last but not the least, there are User settings.
These were all the settings in BlogSpot. I told you about most of them. Once you have changed the settings, you don't have to change them anymore.
Now, when you have updated all the settings, its time to install a custom theme on your blog. Theme is the look and design of your blog. It should be nice and professional, as it decides the first impression of your blog.
There are many default themes in BlogSpot, from which you can choose one. But these are very basic and limited. So you can download custom BlogSpot theme, and install it on your blog.
For this, first of all, download a theme from any theme website, such as Gooyabi Templates. When you download it, you get a zip file. You have to extract it first. Then go to BlogSpot, go to Themes and click on Backup/Restore. Click on Choose File and select the xml file of the extracted zip file and upload. The new theme is installed on your blog.
If there is an error, go to Themese and click on Edit HTML. Then Edit Theme. Cut the theme and paste the new theme. Then Save Theme. The new theme is installed on your blog.
Now its time to create some pages on your blog. These are important for your blog as people come to know more about you and get a smooth experience. Create pages such as About, Contact, Disclaimer, Privacy Policy. You can generate disclaimer and privacy policy online. You will be given codes for these pages.
Now go to BlogSpot dashboard and go to pages. Click on Create New Page. Add the title of the page and. click on HTML below and paste the earlier given code and then Publish the page. In the about page, you can write about you for your blog visitors.
Now when you have setup your blog, its time to write great content on your blog. You may have heard "Content is King." This is absolutely true in blogging. You must write useful and interesting content if you want success in blogging. You write on your blog in the form of posts.
You also have to write SEO optimized (Search Engine Optimized) posts, so that your posts get ranked on Google. You have to keep some factors in your mind while writing posts. These are :
Now you know how to write SEO optimized posts in BlogSpot. You have to write useful and SEO optimized posts regularly. Consistency is very important in blogging. It improves the reputation of your blog as well as improves your blog posts' ranking.
Once you start writing posts, also share them on social media. Create social pages of your blog and share your posts on them. You will get visitors from social media also then.
Do hardwork regularly. Wait around six months. Then go to BlogSpot and then on Earnings. Click on Sign Up for AdSense. Fill the required details correctly and sign up. After some days, your AdSense account will be approved and ads will appear on your blog. Then you will be able to make money from your blog. This is the blog that you created for free on BlogSpot.
When you have an audience on your blog, you can do affiliate marketing and you can sell your own E-books and courses to make money with your blog
That's all about Blogging On BlogSpot. This guide will help you in blogging on BlogSpot for free. You can easily earn money through blogging for free.
It is the not the hosting that help you make money through blogging. Rather, it is the great content that help you make money, whether on BlogSpot or on WordPress.
Well, there are not many such guides available on internet. There are lots of guides for WordPress, for which one has to pay for hosting and domain name. But there are no such guides for BlogSpot, which is absolutely free.
I am able to make this guide because I was one of the bloggers who don't want to spend money in blogging without making money from it.
So, I searched for blog posts and YouTube videos which would guide me regarding blogging on BlogSpot. But I didn't find any major satisfying result.
So I thought I should take the responsibility of telling others like me about blogging on BlogSpot. So I started this blog The UK Talks on BlogSpot, with blogspot subdomain.
I would have used a custom domain name if I wanted, but I wanted to be an example for those who want to start blogging without spending money.
I am telling you about blogging on BlogSpot as I have done and am still blogging on BlogSpot. I will tell you according to my real experience and the learnings I have got from my mistakes.
If you read this guide carefully and execute what is said, you will definitely succeed in blogging, without spending money.
So without wasting your precious time, let's get started.
Create A Blog
To create a blog, go to BlogSpot.com. Then you reach to its website Blogger.com
Note that BlogSpot and Blogger are same. Blogger is its official name, but to avoid confusion with the word 'blogger' (one who blogs), I usually say BlogSpot.
After you reach Blogger.com, sign in with your Google account. After signing in, click on Create New Blog. Then a pop up will appear in which you need to enter the title and address (URL) of your blog. You also have to select a theme for your blog. There are several default themes on Blogger. Now you can choose any theme. Later, you can install a custom theme on your blog.
After selecting the theme, click on 'Create Blog!'. Your blog is now created on BlogSpot. But this just an empty blog. A lot more has to be done in the blog. So let's move on to the next step.
Settings In BlogSpot
After creating the blog, you need to edit some settings in BlogSpot. I will tell you each of them, one by one. You need to edit these settings only once after creating the blog. So let me tell you about the settings in BlogSpot according to the categories.
Basic
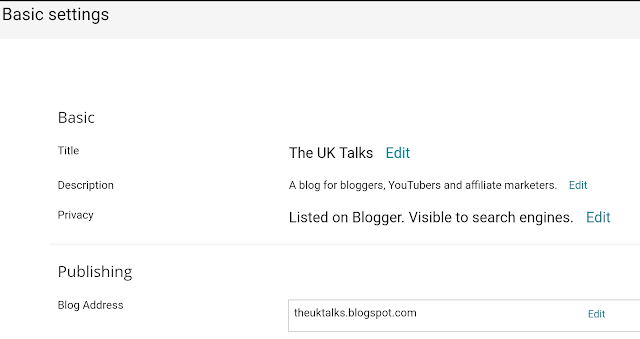
- Title : It is the the title of your blog that you entered while creating the blog. You need not change it.
- Description : It is the short introduction of your blog. Click on Edit and write about your blog in one line. Then click on Save Changes. It should be catchy, so that people get attracted.
- Privacy : It is whether search engines can find and list the blog or not. It is very important for your blog as if search engines are not able to find your blog, your blog will not get traffic (visitors) from Google and other search engines. It is default Yes. You need not change it.
- Blog Address : It is the URL of your blog. This is what you entered while creating your blog. You can change it now if you want, as later there will be some problems if you change it. Otherwise, you don't need to change it. Also, you can add a custom domain name if you want. It would be more professiomal. But if you don't want, no problem. You can surely use the blogspot subdomain.
- HTTPS Redirect : If it is turned on, it enables https on blog instead of http. It makes the blog a lot more safer for visitors and also improves its reputation. It is selected No by default. Click on it and select Yes. This would enable HTTPS on your blog.
- Blog Authors : With this option, you can add your friends or relatives as authors in your blog, so that they can also contribute to the blog. If you want to add an author on your blog, click on Add Authors. Then enter the GMail ID of the person you want to add as an author, and click on Invite Authors. An invitation mail will be sent to that GMail ID. If he accepts it, he will become an author for your blog. You can select the person as an Author or Admin. If you select Author, the person can only write and delete posts. But if you select Admin, the person can do everything that you can do on your blog, such as change the settings and even delete the blog. If you don't want to add authors, you can leave it.
- Blog Readers : These ard the people who can view or visit your blog. You can select Only Blog Authors if you only want your authors to visit and read the blog. You can also select Only Blog Readers if you ony want some people to read your blog. If you select Only Blog Readers, you need to enter the GMail ID of those whom you want to be your readers. Otherwise, if you want everyone can read your blog, select Public. It is selected by default, so you don't need to change it.
Now I have told you about all the Basic Settings in BlogSpot. Its the time that I tell you about posts, comments and sharing settings.
Posts, Comments and Sharing
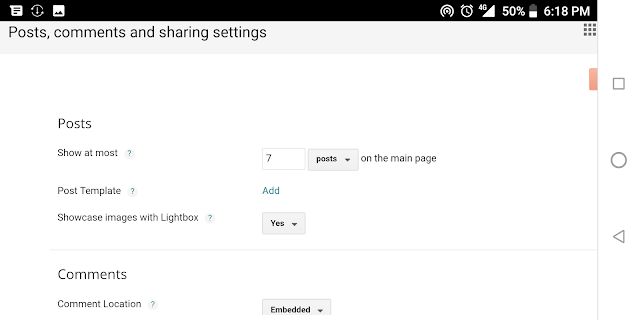
- Show At Most : It is the no. of posts that will appear on the blog's home page. It is 7 by default. Yoh need not change it as if you increase the no. of posts, the loading time of your blog will increase. And if you reduce the no. of posts, there will be so less content to see at the blog's home page. So keep it 7 as it is by default.
- Post Template : You have to do nothing with it. Just leave it as it is.
- Showcase images with Lightbox : It makes the area around images bright. It is Yes by default. You need not change it.
- Comments Location : It decides how will people be able to comment on your blog. For example, embedded, full page, and pop up. It is Embedded by default. You need not change it.
- Who Can Comment : As its name suggests, it decides who will be able to comment on your blog. There are three options - Anyone, Users with Google Accounts, and Members of the blog. I recommend Anyone, as more people will be able to comment then.
- Next three settings are not such important. You need not change them.
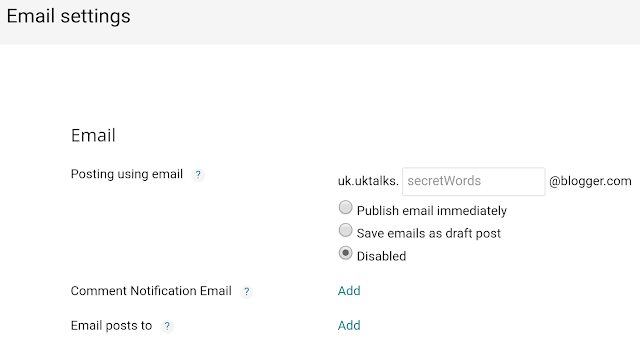
Next are the email settings. Let me tell you about them in brief.
- Post using email : You can get an email ID in the form xx.xxxx@blogger.com. You can use this to send emails to your viewers. You will get three options below it. Select Publish email immediately.
- Comment Notification Email : You can enter upto 10 emails, separated by commas. Whenever one of the them will comment on your blog, he will be notified.
- Email Posts To : You can enter 10 emails whom email will be sent whenever you publish a post. These will first receive an invitation mail. If they accept it, they will be receive an email whenever you publish a post.
Now let's move on to other settings.
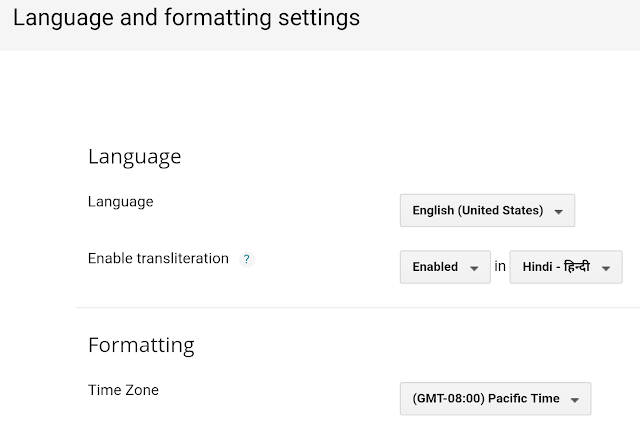
Language and Formatting
There is nothing to change in Language and Formatting. Leave these settings as they are by default.
Now there is Search Preferences. These are very important as the blog's ranking on Google is affected by these settings. So read them carefully.
Search Preferences
- Meta Tags Description : In this you need to add a brief desciption of your blog. I recommend include your blog's title and related keywords in it for better rankings.
- Custom Page Not Found and Custom Page Redirects : As you are a beginner, you don't have to do anything with it and leave it as it is.
- Google Search Console : You have to submit your blog on Google Search Console, so that Google crawls your blog and ranks it. Click on Edit and sign in with the same Google account with which you have the blog. Click on Add a Property and enter the URL of your blog. Then it will automatically redirect to BlogSpot after the process is over.
- Custom robots.txt : In this, you have to paste the sitemap of your blog. You can generate your BlogSpot blog's sitemap with CTRLQ.
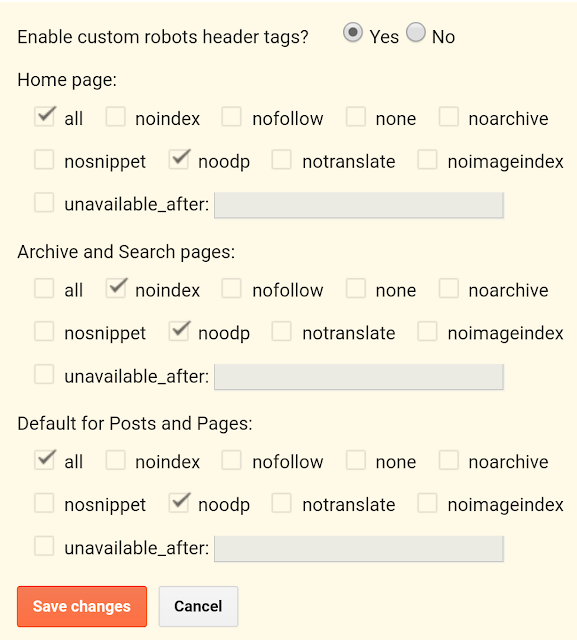
- Custom robots header tags : In this, you need to tick what I am telling you. Below home page, tick all and noodp. Below Archive and Search pages, tick noindex and noodp. And below Default for Pages and Posts, tick all and noodp.

- Custom ads.txt : Its of no use for you right now. So just ignore it and leave it.
Now we have Other Settings. Let's see them.
Other
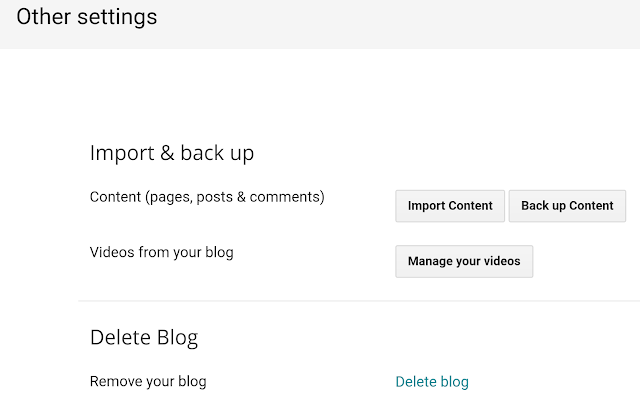
- Content : With this, you can import your blog's content. Also you can backup your blog's content.
- Delete Blog : With this, you can delete your blog permanently.
- Site Feed : Its 4 settings are of your no use now. Leave them.
- Adult Content : You have to mention whether your blog has adult content or not.
- Google Analytics : Here, you have to paste the Google Analytics Web Property ID. First of all, you have to sign in on Google Analytics and add your blog in it. Then, you will be given a Property ID, which you have to copy and paste it in this section.
These were the other settings in BlogSpot. Now, last but not the least, there are User settings.
User settings
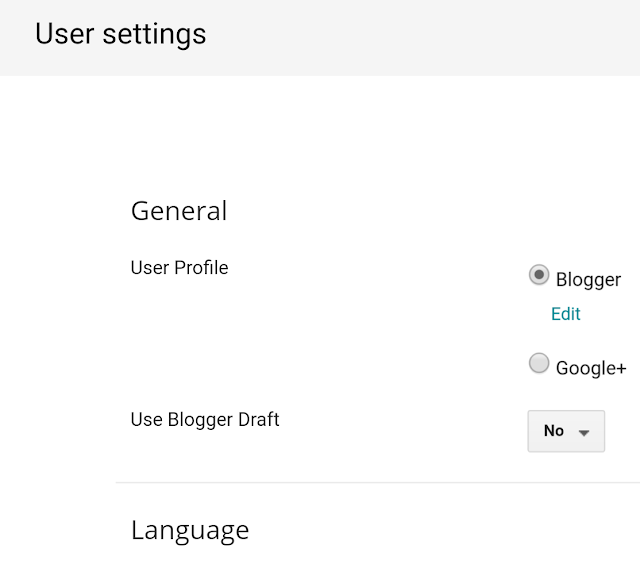
- User Profile : This is what you want to show to your audience, either your Blogger profile, or your Google Plus profile. You can choose any one as you like.
- Use Blogger Draft : Select No in this part.
- Language : It is the language on BlogSpot website. You change it by clicking on the option of Google Account.
These were all the settings in BlogSpot. I told you about most of them. Once you have changed the settings, you don't have to change them anymore.
Now, when you have updated all the settings, its time to install a custom theme on your blog. Theme is the look and design of your blog. It should be nice and professional, as it decides the first impression of your blog.
There are many default themes in BlogSpot, from which you can choose one. But these are very basic and limited. So you can download custom BlogSpot theme, and install it on your blog.
For this, first of all, download a theme from any theme website, such as Gooyabi Templates. When you download it, you get a zip file. You have to extract it first. Then go to BlogSpot, go to Themes and click on Backup/Restore. Click on Choose File and select the xml file of the extracted zip file and upload. The new theme is installed on your blog.
If there is an error, go to Themese and click on Edit HTML. Then Edit Theme. Cut the theme and paste the new theme. Then Save Theme. The new theme is installed on your blog.
Create Pages
Now its time to create some pages on your blog. These are important for your blog as people come to know more about you and get a smooth experience. Create pages such as About, Contact, Disclaimer, Privacy Policy. You can generate disclaimer and privacy policy online. You will be given codes for these pages.
Now go to BlogSpot dashboard and go to pages. Click on Create New Page. Add the title of the page and. click on HTML below and paste the earlier given code and then Publish the page. In the about page, you can write about you for your blog visitors.
Write Great Content
Now when you have setup your blog, its time to write great content on your blog. You may have heard "Content is King." This is absolutely true in blogging. You must write useful and interesting content if you want success in blogging. You write on your blog in the form of posts.
SEO
You also have to write SEO optimized (Search Engine Optimized) posts, so that your posts get ranked on Google. You have to keep some factors in your mind while writing posts. These are :
- Keywords : These are the words on which you want your post to be ranked. You can get the search volume and competition of any keyword for free with Keywords Everywhere Chrome plugin. Click here to know more about installing and using Keywords Everywhere plugin. You can select the keywords which have relatively high search volume and low competition.
- Title and Description : You have to write catchy title and description of your post with your targeted keywords included in it.
- Permalink : It is noticed that short URLs kill long URLs. Permalink is that part of your post's link after your blog's title. For example, in amazon.com/about-us/, about-us is the permalink. Keep it as short as you can.
Now you know how to write SEO optimized posts in BlogSpot. You have to write useful and SEO optimized posts regularly. Consistency is very important in blogging. It improves the reputation of your blog as well as improves your blog posts' ranking.
Once you start writing posts, also share them on social media. Create social pages of your blog and share your posts on them. You will get visitors from social media also then.
Do hardwork regularly. Wait around six months. Then go to BlogSpot and then on Earnings. Click on Sign Up for AdSense. Fill the required details correctly and sign up. After some days, your AdSense account will be approved and ads will appear on your blog. Then you will be able to make money from your blog. This is the blog that you created for free on BlogSpot.
When you have an audience on your blog, you can do affiliate marketing and you can sell your own E-books and courses to make money with your blog
Conclusion
That's all about Blogging On BlogSpot. This guide will help you in blogging on BlogSpot for free. You can easily earn money through blogging for free.
It is the not the hosting that help you make money through blogging. Rather, it is the great content that help you make money, whether on BlogSpot or on WordPress.






0 Comments